
Lego Storage Bag/Playmat
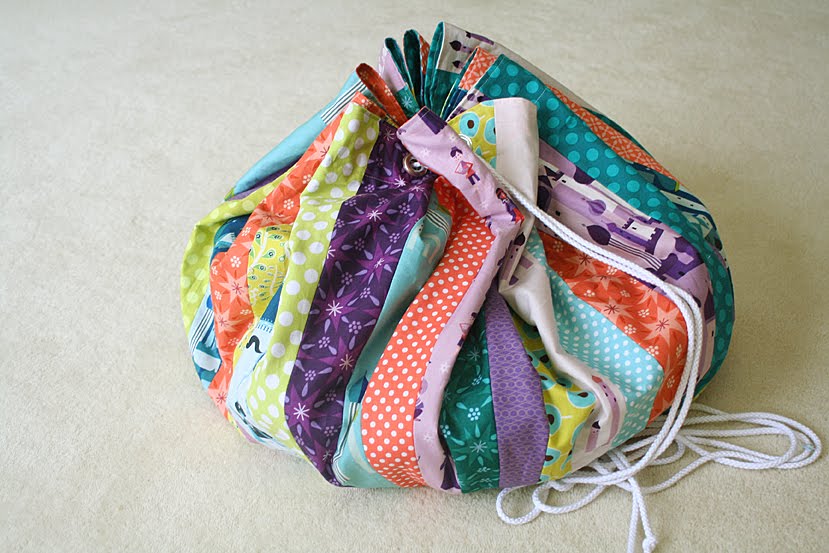
Welcome to my stop on the 12 Gifts of Christmas Blog Hop! Today I'm showing you how to make a drawstring Lego storage bag that doubles as a playmat. Fun, cute, and useful!
I think Legos strike fear into the hearts of organized moms everywhere. We store ours in a big plastic tub, but a few pieces always seem to disappear when my daughter dumps it out to play. And she hates putting all those pieces back into the tub.

So I went in search of an item my sister had for her Legos 25-plus years ago. It was basically a big circular piece of fabric with a drawstring around the edge. The Legos were stored inside, but when you wanted to play, you could lay the fabric out completely flat and spread out the pieces directly on the fabric. This allowed you to easily find the piece that you wanted—but when it came time to clean up, just pull up the drawstring and you're done. Genius! Apparently they no longer make this handy contraption, but that's where a little sewing skills are useful, right? Plus I could make my version a whole lot cuter than the '70s-looking fake denim I recall my sister's being made from.

This bag spreads out to become a playmat that's about 50" wide—a generous size even for the most Lego-obsessed kids. And the bag/playmat combo would be great for other types of toys as well—I'm thinking baby toys, stuffed animals, matchbox cars, or anything with lots of small parts.
You will need:
• Approximately 40 pieces of fabric, 4.5" x 22" (The 22" length can include a selvage—the selvages will end up hidden. A fat-eighth bundle would be perfect for this project.)
• 9"-10" square of fabric for the center
• Total of 1.75 yards for the back of mat/inside of bag
• 1/2" grommet-setting kit and 20 grommets (don't be afraid of grommets! They're so easy!)
• 20 - 1.5" squares of fusible interfacing
• About 14 feet of cotton braided cord (I used 3/16")
• 6 inches of 1"-wide twill tape for the drawstring slider
How to make it:

1. On your 4.5" x 22" pieces of fabric, mark the bottom edge 1.75" from each side, as shown. If you are using a piece with a selvage, make sure to mark the selvage end.

2. Cut the piece on an angle, from one of the marks you just made at the bottom of the rectangle, to the outer corner at the top of the rectangle. Repeat on the other side, cutting from mark to outer corner. If you're using pre-cut fat quarters or fat eighths, check that the length of your pieces is precisely 22" before cutting. Length variances can throw off your angles here.

3. You now have a wedge-shaped piece that looks like this. Repeat the first two steps until you have 40 wedges.

4. Sew your wedges together, lining up the tops of the wedges. It doesn't matter if the bottoms line up. I pressed my seams open.

5. Sew your wedges together in sets of 10. Ten wedges makes a quarter of the circle. Sew the quarters together to create the full circle.

6. When you're ready to sew the final seam in the circle, stop and lay out your circle so that it's as flat as you can get it, regardless of whether your final two raw edges match up. If they do match up, congratulations, you are a sewing rockstar! As you can see, mine didn't come together so well. If you have a gap in your circle when it's lying as flat as it can be, as I did, that means you probably need to add one more wedge. That's why I said you would need approximately 40 pieces of fabric for this project. So at this point, I cut and pieced wedge number 41 into the circle.

7. Now that I've added another wedge, when my circle is lying as flat as possible, the raw edges actually overlap, especially toward the outside of the circle.

8. To fix that, use the top (overlapping) piece as a guide to cut the bottom piece. Line up your ruler with the edge of the top piece and trim. You can now sew your final seam and you end up with a flat wedge-pieced circle measuring about 50" across. (By the way, I think this would also be a great way to make a Christmas tree skirt or a quilt.)

9. To create the center, I traced around one of my salad plates, which are about 8.25" across.
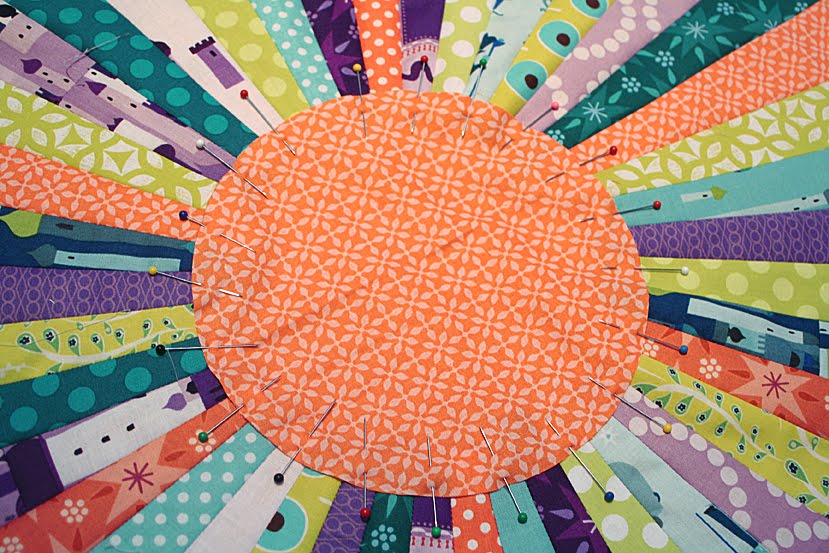
10. Cut out your circle and pin it into place, covering the hole in the middle of the circle as well as any selvages.

11. Applique your center circle by sewing around the edge with a zig-zag stitch.
12. To prepare for setting your grommets, take the 1.5" squares of interfacing and press them onto the wrong side of the circle. (The interfacing will give your grommet a little more stability.) I placed my interfacing squares in the center of every second wedge piece, with the top edge of the square about 1" from the raw edge.

13. Now the outside of your bag is looking good, so let's tackle the lining. Circle measurements require too much math for me, so instead, I laid out the outside of the bag and then laid pieces of fabric over it until I had a design that I liked and the entire outside was covered. Then I sewed all the pieces together and laid out both the outside and the lining again. Using the outside of the bag as my guide, I trimmed the lining into a circular shape, leaving about 1/2" of extra fabric all the way around.

14. Pin around the edges and sew a 1/2" seam around the perimeter, leaving an opening about 5" wide for turning. Trim excess seam allowance.

15. Turn your circle right side out and press.

16. Top stitch around the outside of the circle. I stitched 1/4" from the edge and about 2" from the edge. I used the top stitching to close up the opening I left for turning.

17. Now you need to cut the holes for your grommets. I know, this part is scary. If you screw up, you could be ruining the whole project. But no pressure! I promise you can do it! Feel each wedge to find the ones with the interfacing that you added before turning. On each wedge with interfacing, mark the center of the wedge about 1.5" from the top. Then cut a small "X" into all three layers of fabric (outside, lining, and interfacing). I did this by pinching a small fold right where I wanted the X, and then clipping a V, which turned into an X when unfolded again. Finally, to clean things up a bit, snip off the points that you created.
Adding the Grommets and Finishing the Bag

1. First, don't buy the Dritz grommet-setting kit that's available at Joann. I started with that one, but the plastic setting tools are so cheap and poorly made, they only lasted for six grommets. Buy your grommet kit from a hardware store instead. I got this kit from my local Ace—it was only $1 more than the kit from Joann and it works way better. (My kit came with brass grommets, but I also found satin nickel refill grommets and used those instead.)

2. A grommet kit has four basic parts: The anvil, the setting tool, the grommet barrel, and the washer. The washers sometimes have pointy teeth on one side to grab the fabric you're setting the grommet into.

3. To set the grommet, position the barrel piece on the anvil with the barrel sticking up, and put the X-shaped hole in your fabric over the barrel of the grommet, as shown.

4. Put the washer over the barrel and the fabric, as shown, teeth pointing down.

5. Put the setting tool on top of it all and use a hammer to wail on that bad boy until it flattens out and becomes attached to the fabric. You may have to put some arm into it—I don't recommend trying this during nap time. Lol. Also, be sure you are doing this step on a very hard surface—like concrete or a work bench. I don't want to be responsible for any maimed dining room tables.

6. That's it—you've just installed a lovely, professional-looking grommet.

7. Add the braided cord, lacing it in and out of the grommets around the perimeter of the circle. Knot the ends of the cord. Take your twill tape and wrap it in a figure 8 around the two ends of the cord, just above the knots. Sew down the middle of the figure 8 to create a drawstring slider. And you're done! You now have a Lego keeper that turns into a handy playmat while the Legos are in use.