
Make this quick and easy Arrow Baby Quilt

Half-square triangles are the bread-and-butter of the quilting world: You can’t make much without them! Yet they are a finicky unit to make, and a little inaccuracy in your finished HSTs can put you in a world of hurt. I recently released a new product that helps put an end to inaccurate HSTs: My Perfect HST Templates. Not only do these templates increase the accuracy of your units, they also allow you to make HSTs without marking the backs of fabric or trimming them later, speeding up the process considerably!

Today I thought I would take you through the process of making this adorable Arrow Baby Quilt that I just made for my newborn nephew, using my Perfect HST templates. I’m giving you the instructions using Perfect HSTs, and I’m also giving you instructions to do it the “old-fashioned way”—because yes, we’re quilters. We do still like the old-fashioned way from time to time. 😊

Materials to Make the Arrow Baby Quilt
Difficulty level: Confident Beginner
Time to Complete: Weekend
• 6 fat quarters (or straight-cut quarter yards)
• 1-5/8 yard of white (background fabric)
• 1-1/2 yards of backing fabric
• 1/2 yard of binding fabric
Cutting list (if using the Perfect HST Templates):
• Cut 3 pieces 7-1/2″ x 9-1/2″ from each fat quarter
• Cut 18 pieces 7-1/2″ x 9-1/2″ from the white (background fabric)
• Cut 5 strips 3-1/2″ x 36-1/2″ from the white (background fabric)
Cutting list (if using the standard HST method):
• Cut 12 squares 4″ x 4″ from each fat quarter
• Cut 72 squares 4″ x 4″ from white (background fabric)
• Cut 5 strips 3-1/2″ x 36-1/2″ from the white (background fabric)
Other materials needed: coordinating thread, cutting mat, quilt batting, quilting cotton, rotary cutter

Make the HSTs (if using the “Perfect HST” templates)

1. Purchase and download my Perfect HST Templates (found here.) Print 18 copies of the 3″ Finished HST template (found on page 11 of the PDF). Be sure to print your template at Actual Size (100% scaling). This setting can be found under “Page Sizing and Handling” in the print dialogue box (“Shrink to Fit” is often the default, which will result in HSTs that are too small!). After printing, use a ruler to check the template’s 1″ scale to ensure the size printed accurately. You can print your templates on standard office paper/copy paper, or use blank sheets of newsprint for even easier tearing later.

2. Cut out the templates on the outer dashed line. The template size is designed to approximately match up to the 7-1/2″ x 9-1/2″ fabric pieces you cut earlier.

3. Stack two pieces of fabric, right sides together, as shown. Place the trimmed paper template on top of the stack, printed side of the paper facing up.
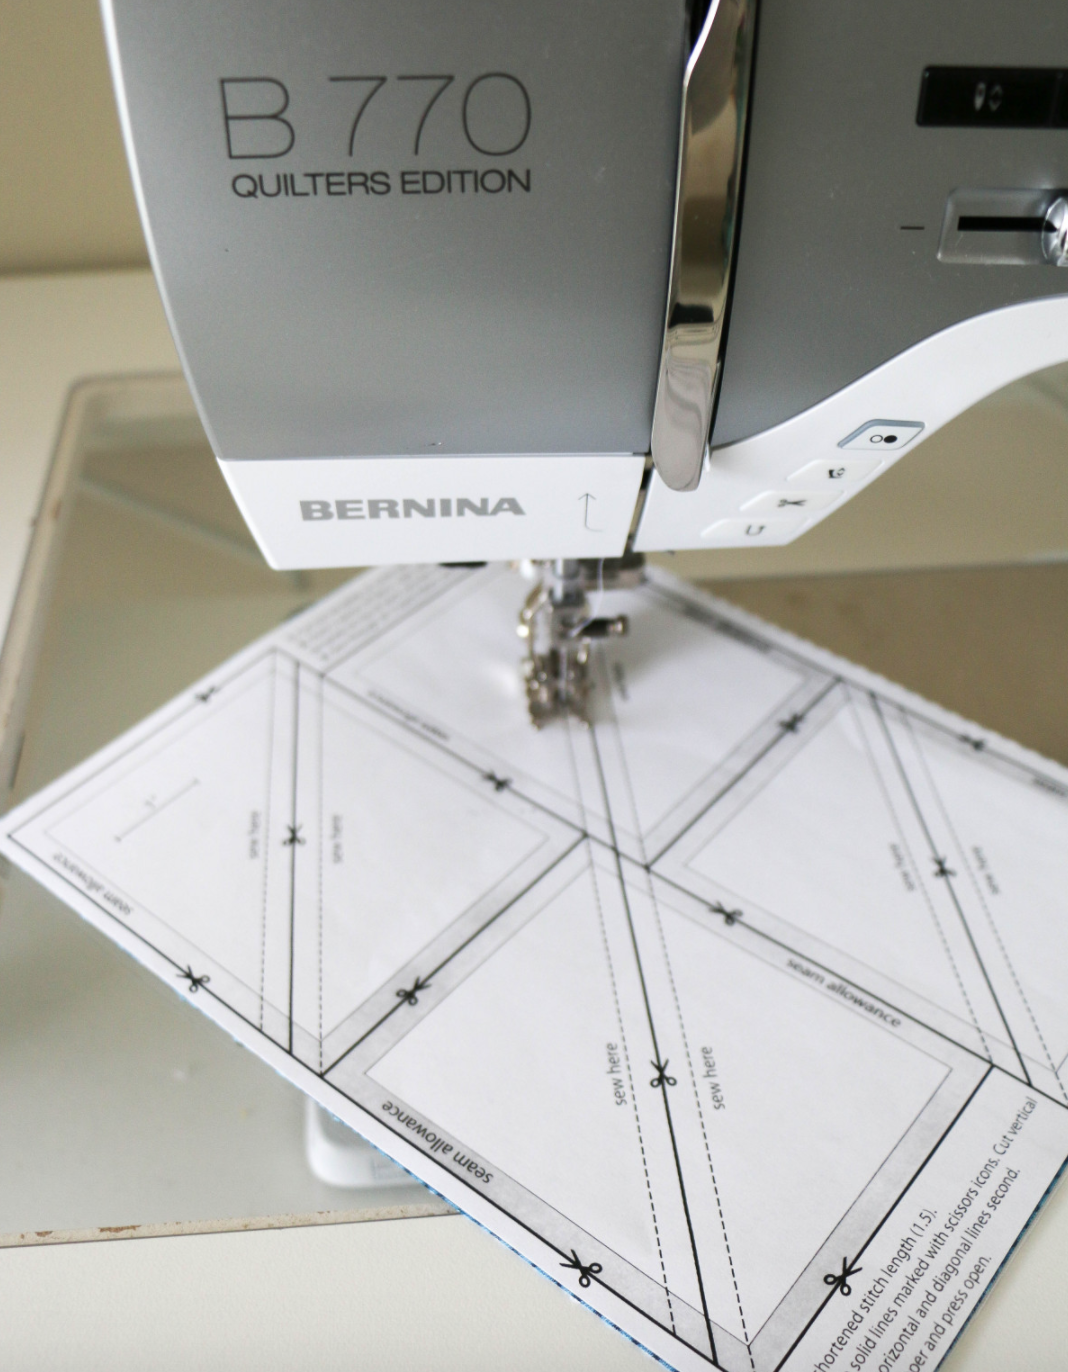
4. Sew on the dotted lines that say “Sew here,” through all three layers (the two pieces of fabric and the paper template). Before you start sewing, be sure to turn down the stitch length on your sewing machine—I bring mine to about 1.5. The shorter stitch length will help you tear off the paper when you’re done stitching.


5. Using a rotary cutter and quilting ruler, cut along the solid lines marked with scissors icons. Cut the template’s vertical lines first, then the horizontal and diagonal lines.

6. Carefully remove the paper by folding it back along the stitching and tearing along the seam line. Press HSTs open. No squaring up needed!
Make the HSTs (if using the standard HST method)

1. Mark a diagonal line from corner to corner on the backs of the (72) 4″ white squares.

2. Pair up one 4″ colored square and one 4″ white square, with right sides facing. Stitch 1/4″ away on each side of marked diagonal line. Cut HSTs apart on the marked diagonal line and press open.

3. Square up each HST to 3-1/2″ unfinished.
Complete the quilt (both methods):

1. Join HSTs to create a four-patch block as shown above. Make 6 four-patch blocks in each color, for a total of 36 blocks.

2. Join the 6 four-patch blocks of each color into a row, as shown above.

3. Assemble the quilt top by joining the rows of blocks and and the 3-1/2″ x 36″ sashing strips, as shown above.
4. Quilt and bind as desired. I quilted in a wide zig-zag pattern 1/2″ apart for more angled movement in the completed quilt.
