
Kansas Dust Storm: A free block pattern

Welcome to our last block in the Summer Sampler Series 10th Anniversary celebration! I hope you've enjoyed this trip down memory lane with Katie, Faith, and myself, and will get lots of use out of these fabulous—and free!—block patterns. I know I’ve enjoyed updating and improving my block instructions. I’ve certainly improved my piecing skills over the years, but I also think I’ve learned a thing or two about pattern writing since then! (Click here for the original post, which includes some interesting info about the history of this block.)
This is, of course, a foundation paper-pieced block, but if you haven’t done paper-piecing before (or even if you have!), check out my video on how to make this block, with a step-by-step demo of how to piece the whole thing. You can also scroll on down for the complete instructions in blog post form, below, OR click here to buy the instructions for all 12 of the Summer Sampler 10th Anniversary blocks in a handy, more-printable PDF format.
Oh and hey—have you enjoyed this series of free block patterns? If so, you’ll love Summer Sampler 2021, a brand-new series of blocks that launched this week! Our first block will be released June 7. Click here for more information or to join!
To make the Kansas Dust Storm block, you will need:

The Kansas Dust Storm Paper-Piecing Templates. Be sure to download the template PDF files to your device and print from Adobe Acrobat, making sure to print the templates at 100% size or actual size.
• Print 4 copies of Template A
• Print 4 copies of Template B
• Print 4 copies of Template C
Fabric:
• For Templates B and C, Section 3: (8) 3-1/2" x 3-1/2” squares (this is the center of the block—I’m using Kona Wasabi)
• For Template A, Section 1, and Templates B and C, Sections 2 and 4: (8) 4-1/2" x 4-1/2” squares (I’m using (Kona Salmon)
• For Template A, Section 4: (2) 5” x 5” squares (I’m using Kona Teal Blue)
• For Templates B and C, Section 1: (8) 3” x 3” squares (I’m using Kona White)
• For Template A, Sections 2 and 3: (8) 4" x 6-1/2” pieces (I’m using Kona White)
Prepare to start piecing:

1. I recommend labeling your printed template sections with the colors you are using in each section. This will prevent confusion and mistakes as you are piecing the templates. You can see in the photo above that I’ve labeled each section with the colors I’m using.

2. Cut the (2) 5” x 5” squares (my Teal Blue) in half diagonally, from corner to corner, to create (4) triangles, as shown.

3. Cut the (8) 4-1/2” x 4-1/2” squares (my Salmon squares) in half diagonally, from corner to corner, to create (16) triangles.


4. Take (4)—only (4)!—of those (16) triangles and cut them in half again to make (8) smaller triangles. You should now have (12) larger Salmon triangles and (8) smaller Salmon triangles.
Piece Template A:

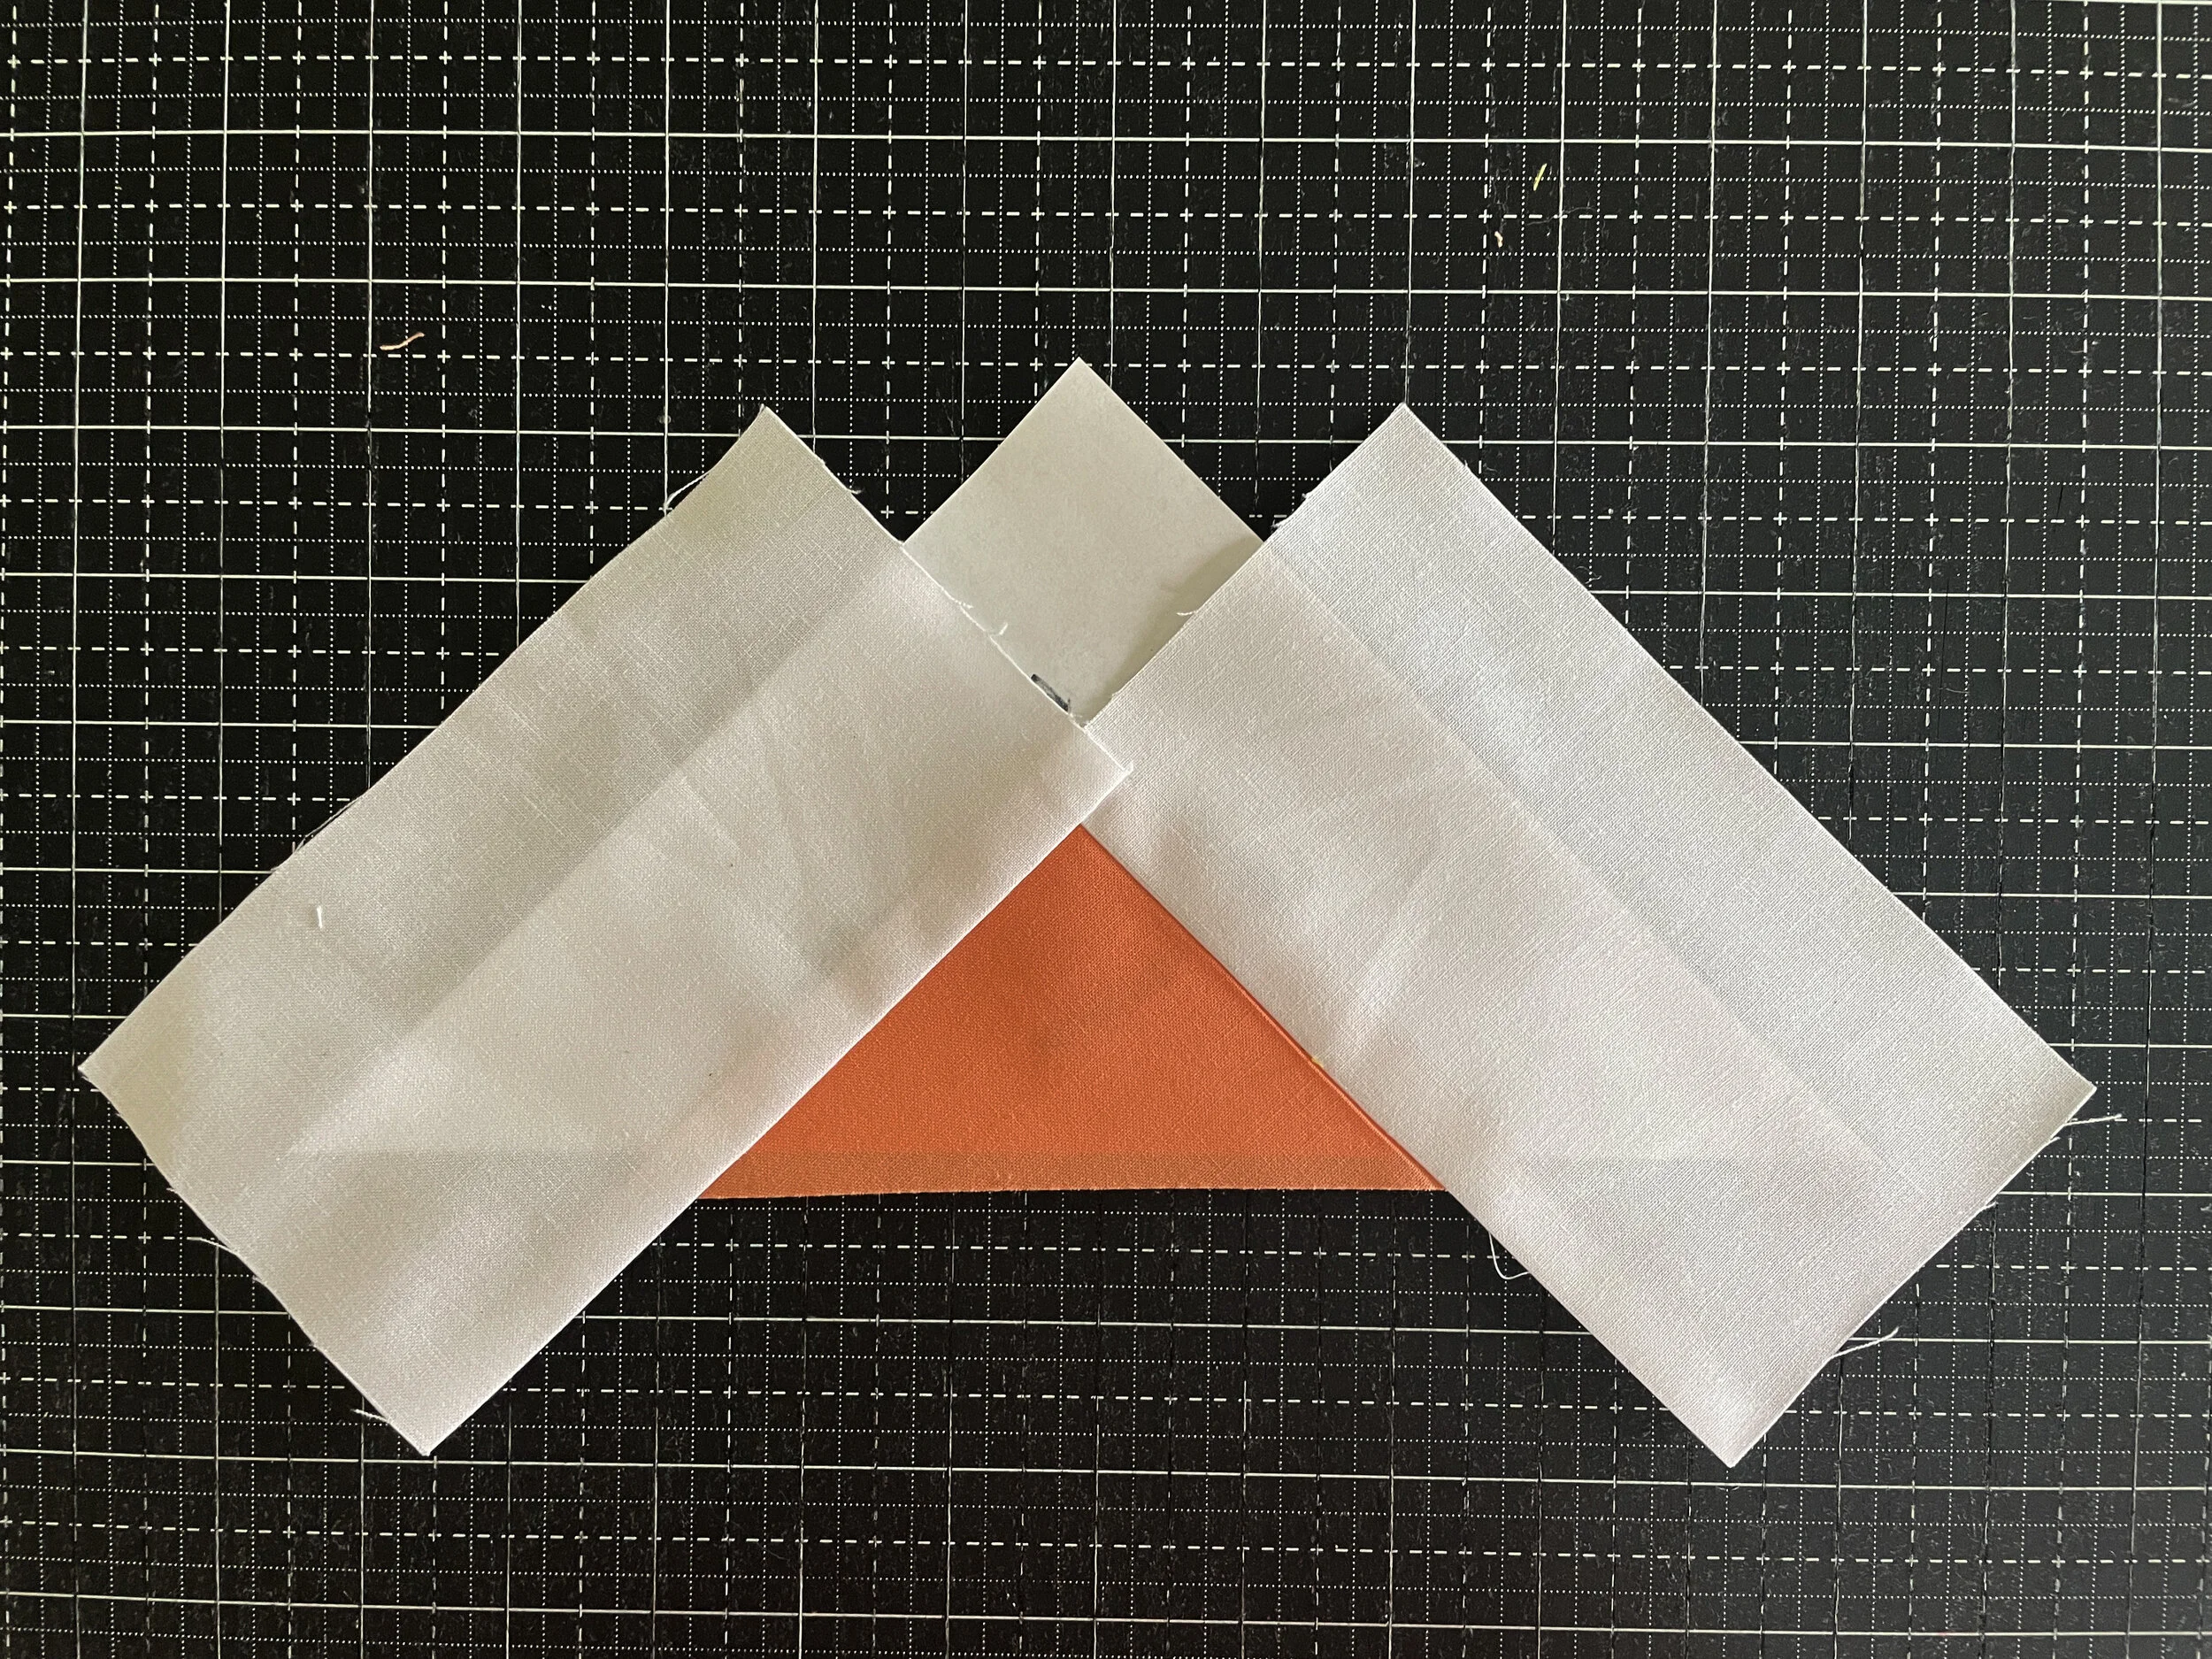
1. Place one of the 12 larger Salmon triangles on the back of Template A, so that it covers Section 1 (but on the back of the template). You can check that your piece is in the right place by holding it up to a light source. Pin into place on your template.

2. Lay one of the White 4" x 6-1/2" background pieces over the top of the center triangle, right sides facing. Match up the short edge of the 4” x 6-1/2” piece with the right side of the Salmon triangle, and the long edge with the left side of the Salmon triangle, as shown.

3. Adjust your stitch length to around 1.5, flip the whole thing over, and sew (with the Template side facing up) along the line between Sections 1 and 2. (Using a shorter stitch length helps perforate the paper for easier tearing later.) Press into place.

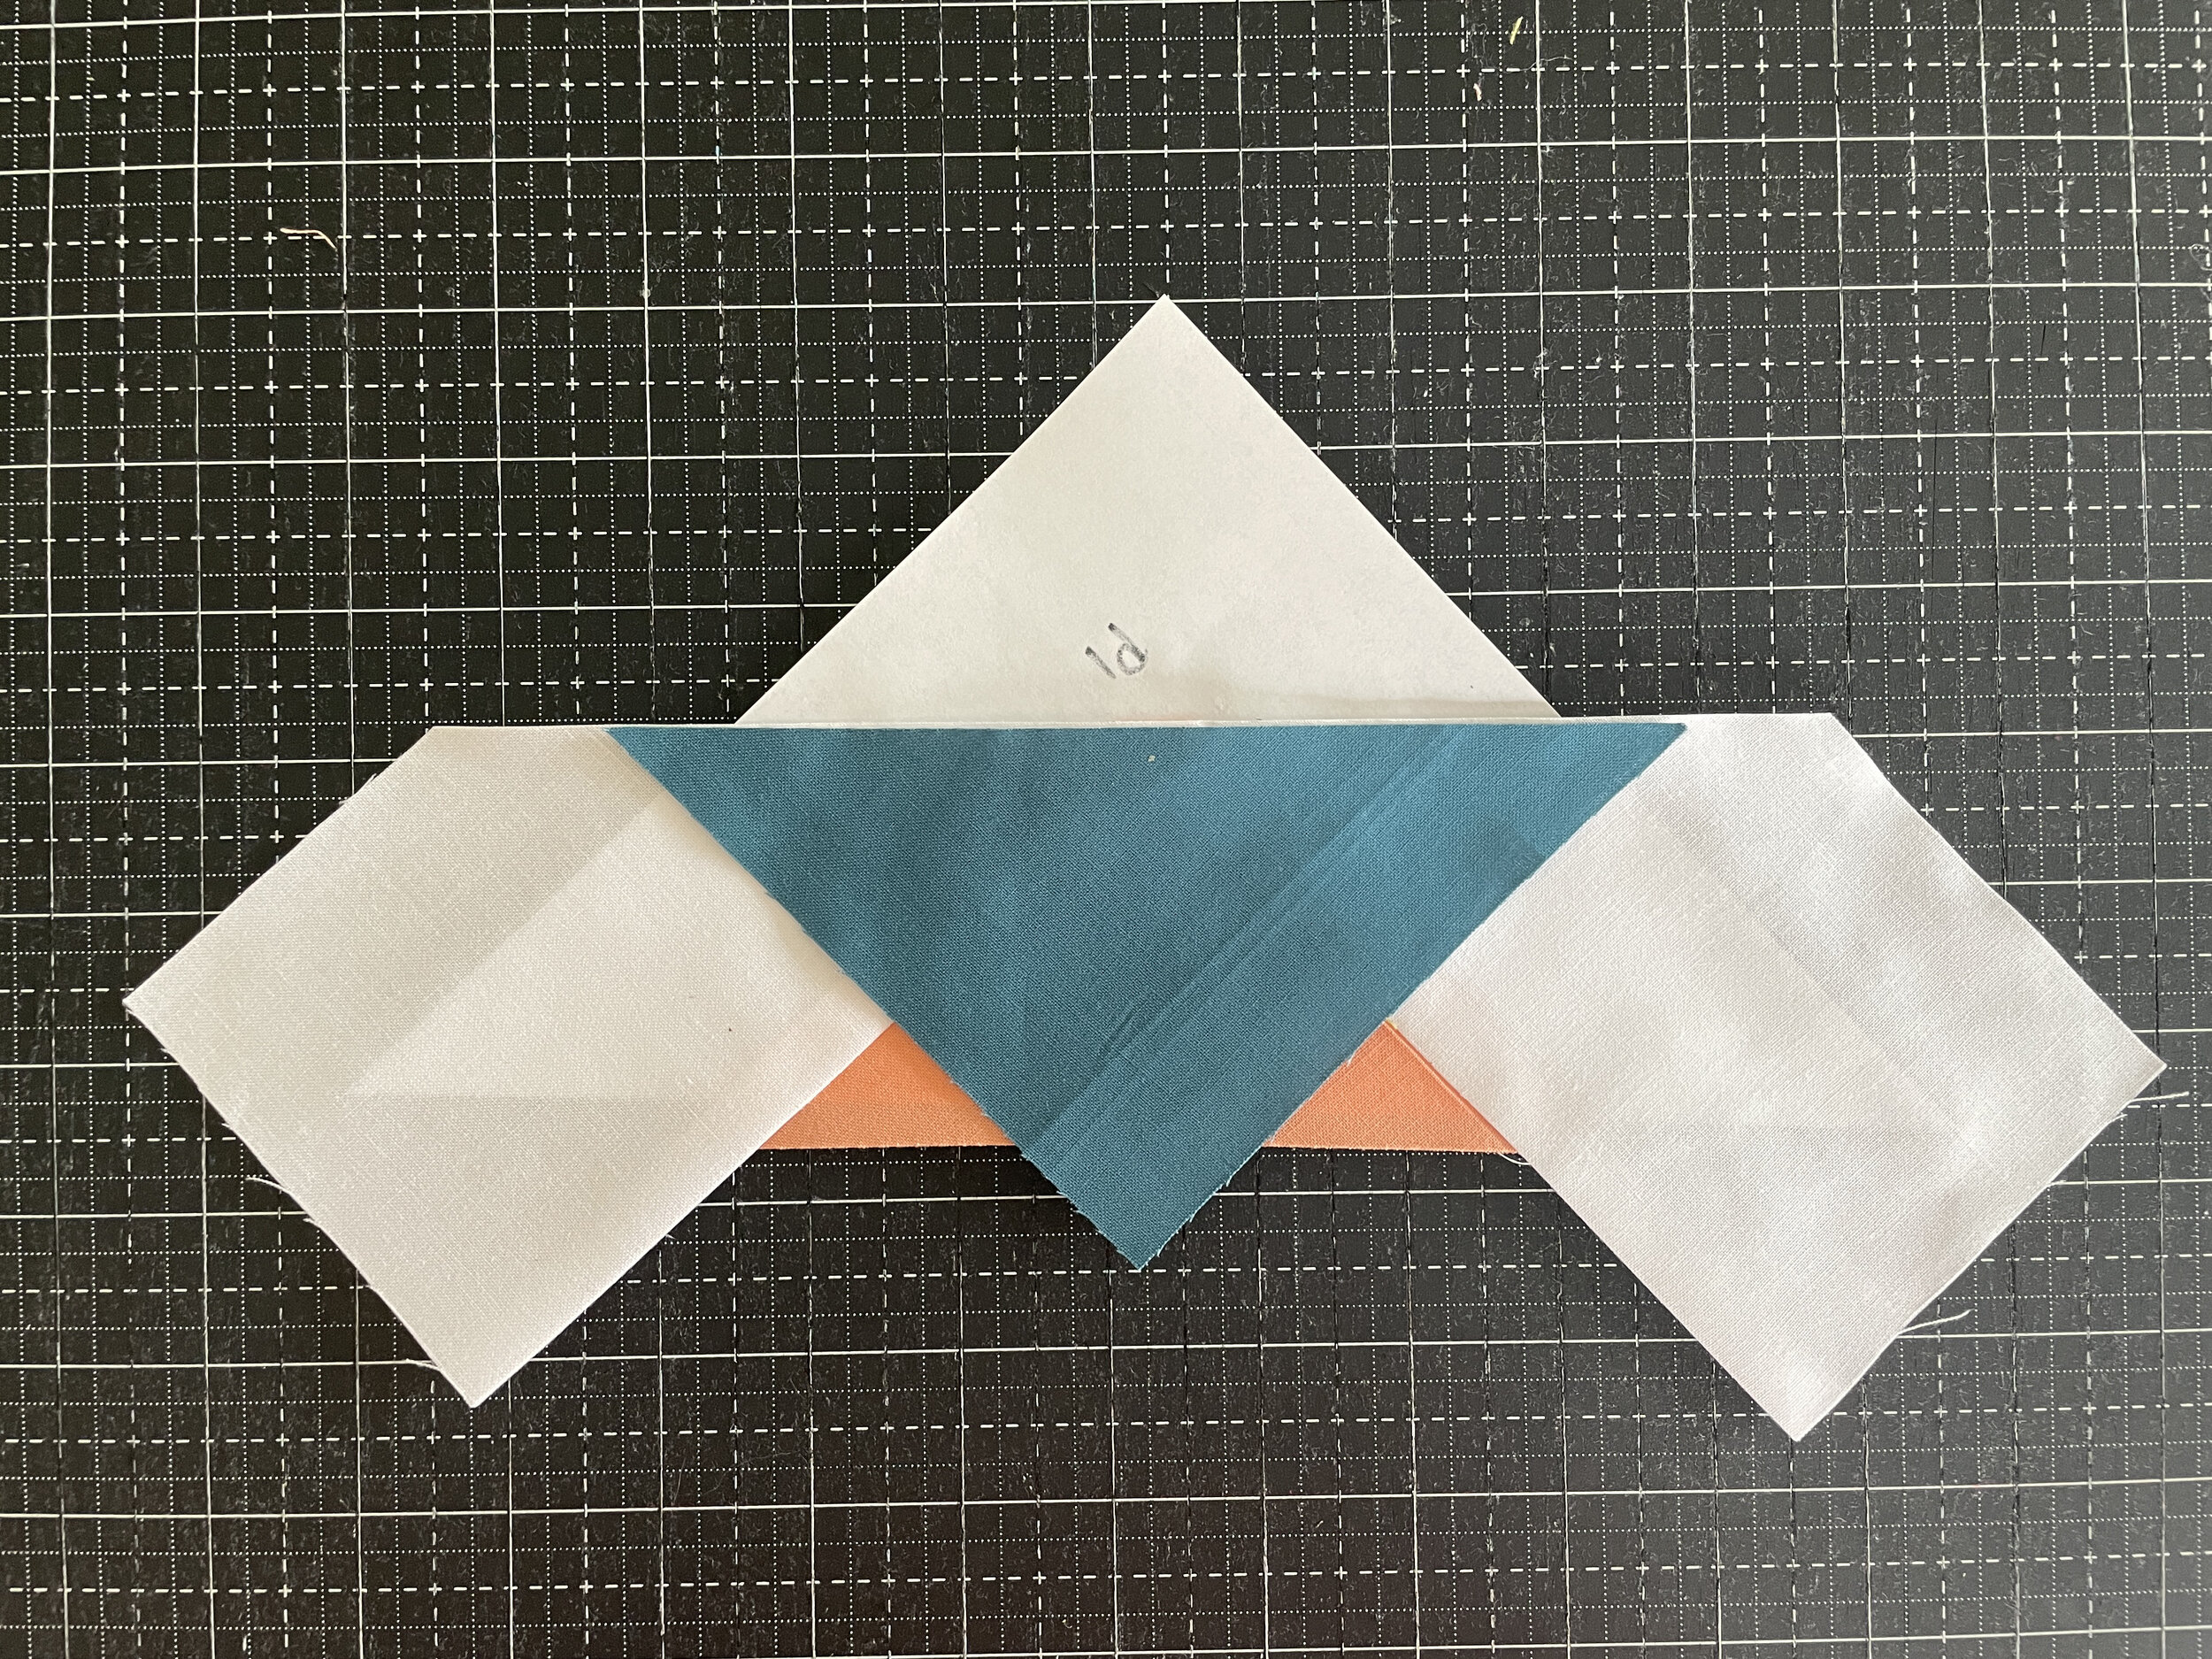
4. Grab another White 4” x 6-1/2” piece and lay it over the Salmon triangle, right sides facing. This time, the short edge of the 4” x 6-1/2” piece should be on the right side of the Salmon triangle, and the long edge should be on the left side of the Salmon triangle, as shown above.
5. Now it should look like this.

6. Next, with the paper template facing toward you, fold back the paper template along the line between Sections 1/2/3 and 4, as shown.

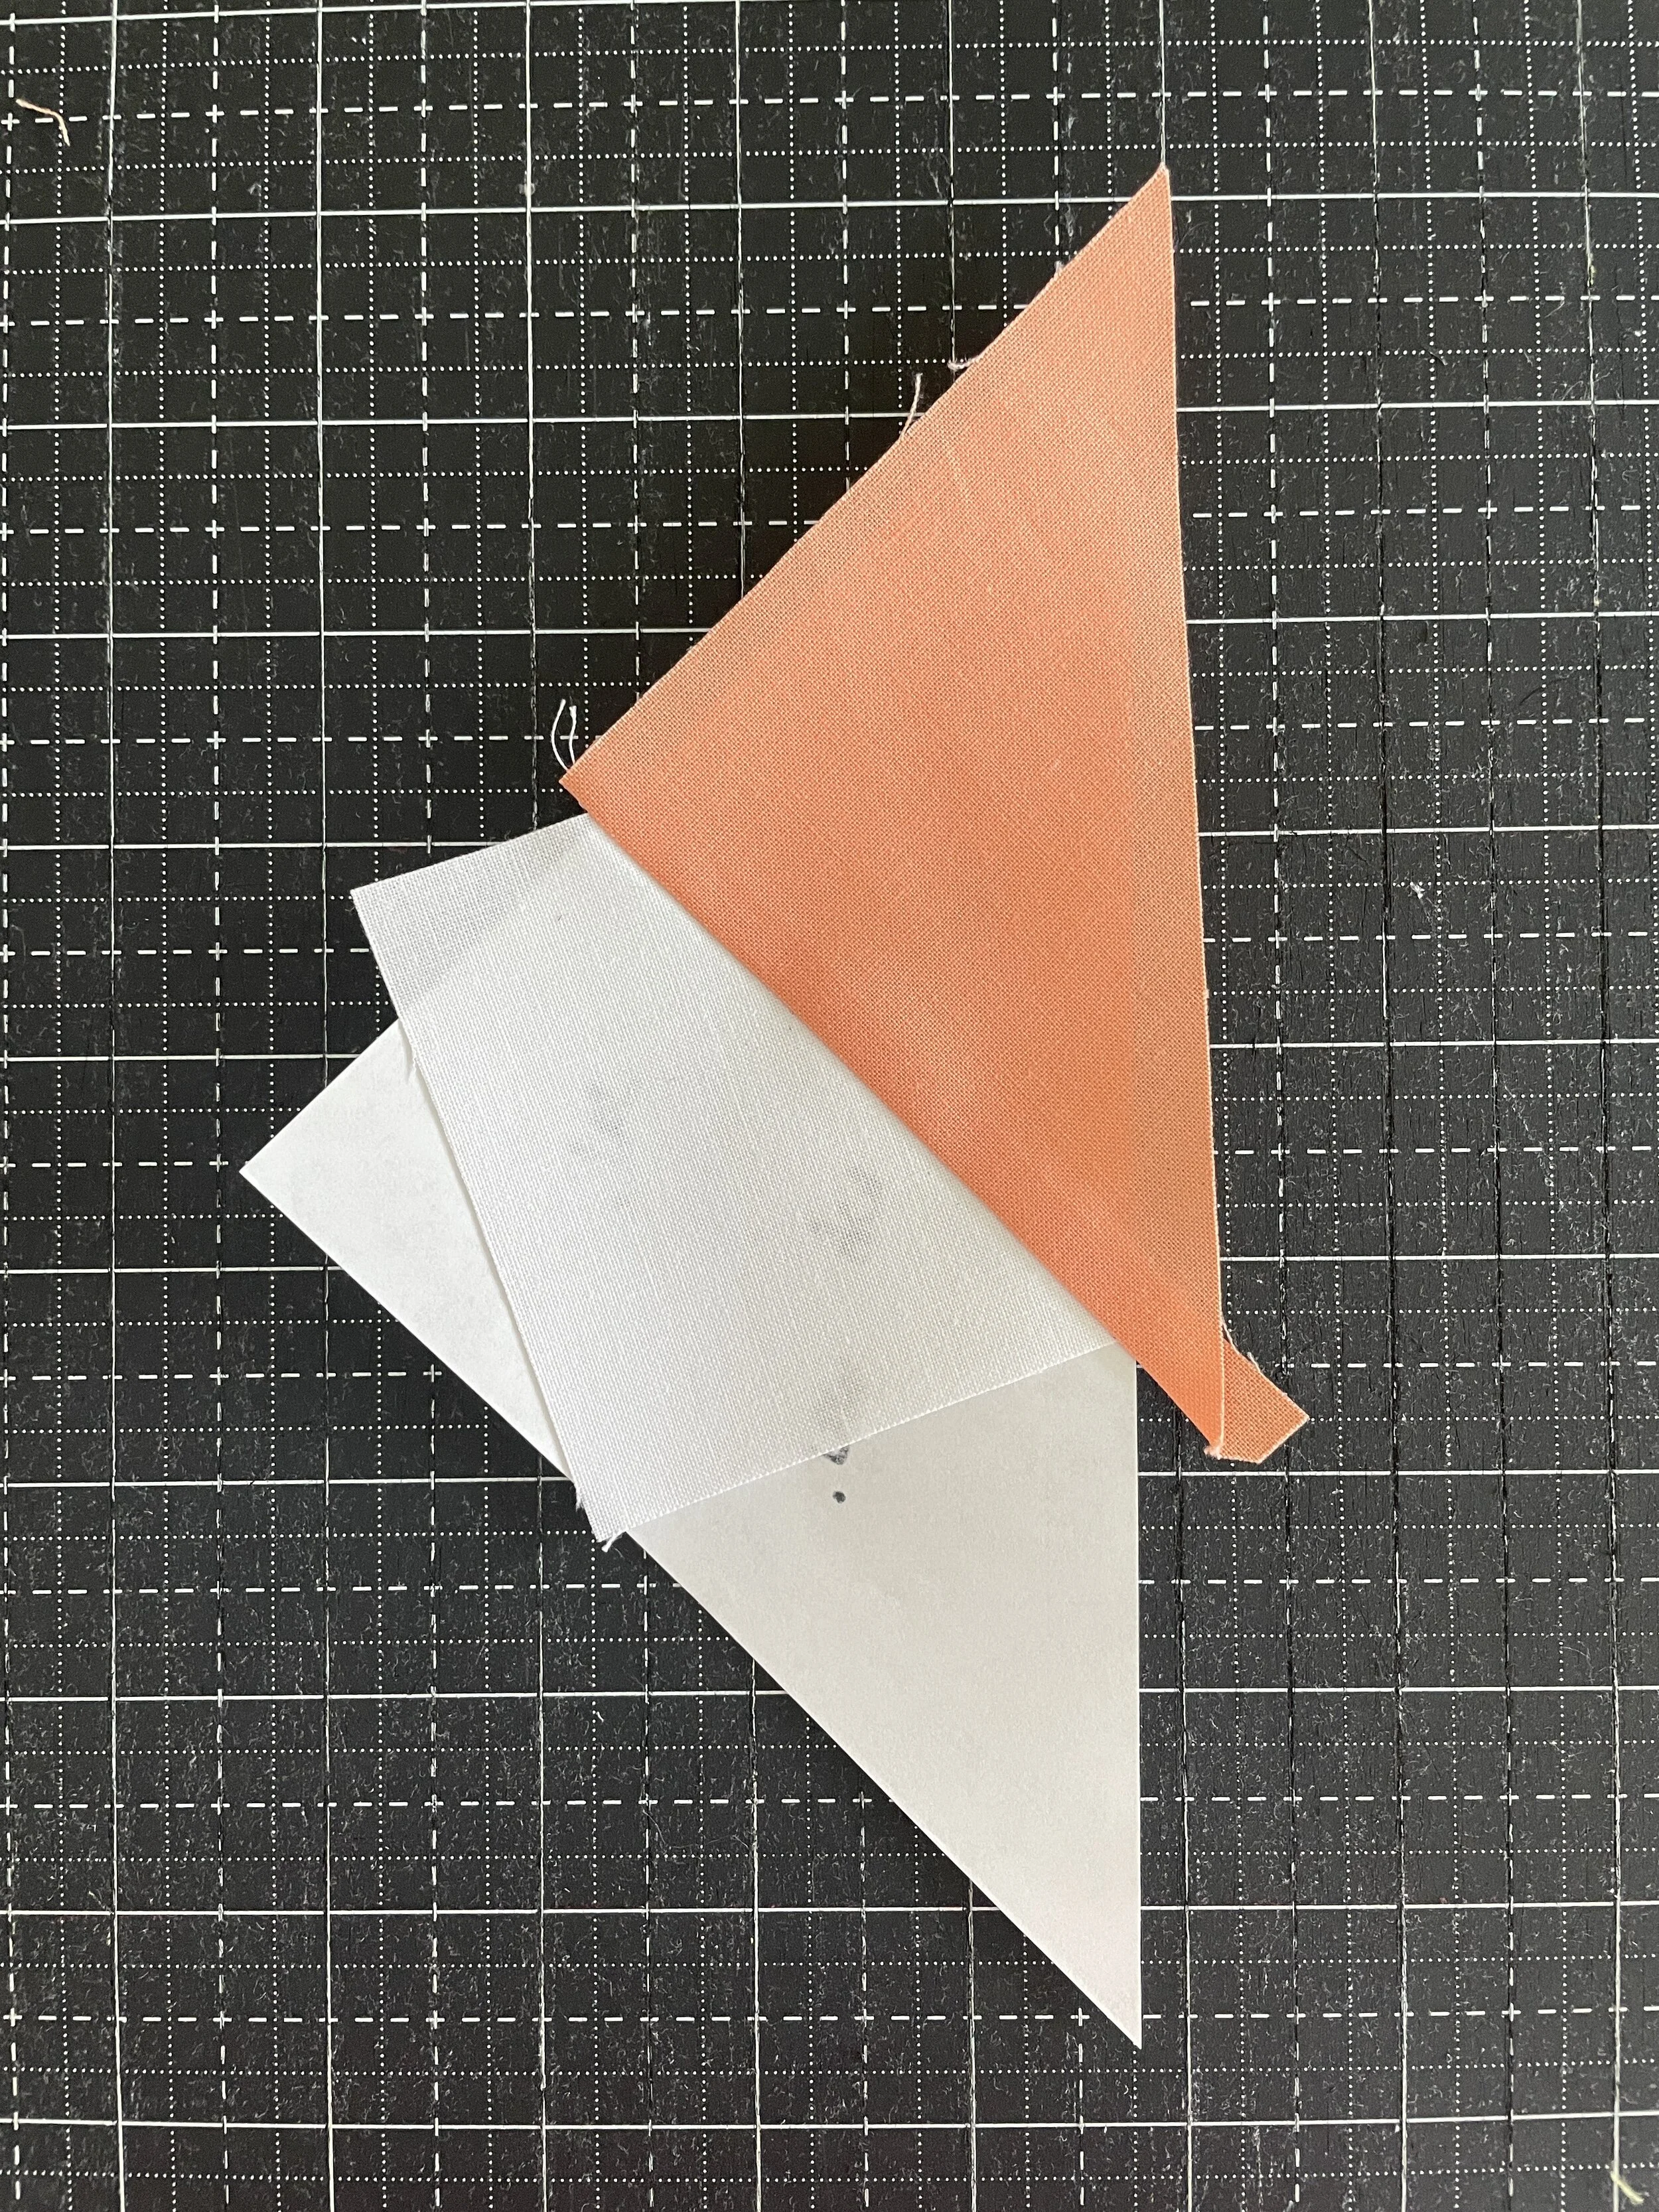
7. Place your quilting ruler over the entire thing, with the quarter-inch mark on the ruler lined up with the fold in the paper. Trim off the excess fabric along the edge of the ruler, 1/4” from the fold in the template, as shown above. Trimming the excess fabric gives you a great visual reference point for where to place the next piece of fabric.
8. Place one of the triangles from the Teal Blue 5” x 5” square along the fabric edge that you just trimmed, right sides together, as shown. Flip and sew along the line.

9. Press this piece into place. Your unit should now look like this.

10. Trim around your Template A unit, lining up the 1/4” mark on your ruler with the inner line on the template, as shown.

11. Your completed Template A should look like this. Repeat this process to make 3 more Template A units.
Make Templates B and C

1. Now we'll move on to the B and C templates, which are exactly the same, except that they are mirror images of each other. Start by pinning a 3" x 3" White background piece onto the back of one of the B or C Templates, covering Section 1.

2. Again, fold back the template along the line between Sections 1 and 2, and trim the excess fabric 1/4” away from the fold in the paper template.

3. Place one of the larger Salmon triangles along the edge of the fabric where you just trimmed. Be sure to align one of the short edges of the Salmon triangle with the edge of the white fabric where you trimmed. Turn the whole thing over and sew along the line.
4. Press the Salmon piece into place. The unit should now look like this.

5. Place the Wasabi/Section 3 piece next. Sew and press into place.

6. Finish piecing the unit with the smaller Salmon triangles for Section 4. Press the Salmon piece into place and trim the unit.

7. Your completed/trimmed B and C Template Units should look like this. Make 4 each of Template B and Template C.
Assemble the Block
At this point, you may choose to remove the paper from your units. However, at this point in the process I prefer to keep the paper on. There are a lot of bias edges in these units, and lots of narrow angled points, so keeping the paper on helps stabilize those edges a bit as you’re sewing the units together. This is personal preference though—if you aren’t sure, try it both ways and see which method gives you more success!

1. Grab a Template B unit and a Template C unit. Sew the short edges of these triangular units together as shown, with the Wasabi/Section 3 pieces meeting in the center, to make a larger triangle as shown above.

Do NOT sew them together like this, into a square shape! This is an easy mistake to make with this block, as you can see. It looks right, but it's not.

2. Once your B and C Template Units are joined together, join the B/C Units to an A unit, as shown above.

3. Then piece the four quartiles together to complete the block.

And there we have it: 12 completed sampler blocks. But before we leave it, let’s stop for a moment to admire the print explosion that was my 2011 version of Kansas Dust Storm. 😂Yasssss. I even had the fussy-cutting working in the center, because those two other prints were clearly not enough busyness for one block. LOL.
Huge thanks to everyone who quilted along with Kate, Faith, and me these past few months. I hope you all had fun, and don’t forget to hashtag your blocks #summersamplerturns10 if you make this block. And OF COURSE, if you enjoyed these 10th Anniversary free blocks, imagine how much fun you’d have with one of our more recent Summer Sampler patterns! Won’t you join us for the 2021 quilt-along? Lots more info is available right here!